Unit Tests Basics

Update: The article has been updated to work with the VS2022 and PHPUnit 9.5
Testing is essential for verifying that a project runs as expected. When we are implementing new features or refactoring the old ones, we want to make sure we didn't break any existing functionality. For this purpose, we can take advantage of PHPUnit - the most widely used unit testing framework for PHP language.
PHPUnit can be used from the command line, but we can also use it from Visual Studio Testing UI. This dramatically reduces the effort to create and maintain unit tests for new or existing code. In this article, I will demonstrate the basic functionality of unit testing from Visual Studio. This integration works since VS2012 for PHPUnit 5 and 6 (since PHP Tools for Visual Studio 1.24).
To follow this article, you can get a sample project from Github.
To enable testing, we'll need to create a PHP Project. You can either create a new project (File | New | Project, select PHP and choose PHP Console Project or PHP Web Project) or create a project from existing code.
PHP Tools for Visual Studio comes with build-in PHPUnit. Therefore, we don't need to download PHPUnit nor configure it if we don't want to. But it's a good practice to add a PHPUnit as a development composer dependency(require-dev in composer.json).
Writing a test for PHPUnit requires the following:
Test.php.testPHPUnit_Framework_TestCase, in later versions full class name is PHPUnit\Framework\TestCase - that's what will be in the sample projecttest.These requirements are case-insensitive.
The sample project contains the project BankAccount with three files:
BankAccount.php BankAccoutTest.phpphpunit.xmlBankAccount.php contains a simple object which represents the bank account of a customer with two methods, one to deposit funds and the other to withdraw funds. There is an intentional bug in this method, so we can demonstrate what it looks like when the test will fail.
<?php

/**
 * Bank Account demo class.
 *
 */
class BankAccount
{
    var $customerName;
    var $balance;
    var $frozen;

    function __construct($customerName, $balance)
    {
        $this->customerName = $customerName;
        $this->balance = $balance;
    }

    public function Withdraw($amount)
    {
        if ($this->frozen)
        {
            throw new InvalidArgumentException("Account frozen");
        }

        if ($amount > $this->balance)
        {
            throw new InvalidArgumentException("Amount has to be less or equal to $this->balance");
        }

        if ($amount < 0)
        {
            throw new InvalidArgumentException("Amount has to be greater or equal to 0.");
        }

        $this->balance += $amount; // intentionally incorrect code
    }

    public function Deposit($amount)
    {
        if ($this->frozen)
        {
            throw new InvalidArgumentException("Account frozen");
        }

        if ($amount < 0)
        {
            throw new InvalidArgumentException("Amount has to be greater or equal to 0.");
        }

        $this->balance += $amount;
    }

    private function FreezeAccount()
    {
        $this->frozen = true;
    }

    private function UnfreezeAccount()
    {
        $this->frozen = false;
    }

}
The other file contains a test for BankAccount class. To test the BankAccount.Withdraw method we can write two tests. One that verifies the standard behavior of the method and one that verifies that a withdrawal of more funds than what the account's balance has will fail.
<?php

require "BankAccount.php";

class BankAccountTest extends PHPUnit\Framework\TestCase
{
    /**
     * @var BankAccount
     */
    protected $account;

    function setUp() : void {
        $this->account =  new BankAccount("John", 10);
    }

    /**
     * @group General
     */
    function testWithdraw_ValidAmount_ChangesBalance()
    {
        $withdrawal = 1;
        $expected = 9;

        $this->account->Withdraw($withdrawal);
        self::assertEquals($expected, $this->account->balance);
    }

    /**
     * @group Exceptions
     */
    function testWithdraw_MoreAmountThanBalance_Throws()
    {
        $this->expectException(InvalidArgumentException::class);

        $this->account->Withdraw(20);

    }
}
testWithdraw_ValidAmount_ChangesBalance uses assertEquals static method to determine whether the test method will pass or fail.
Note: We're not sure why all the available examples for PHPUnit use
$this->assertEqualswhen this method is static! PHP will run it, but why? Please write in the comments section if you know the answer.
Withdraw_ValidAmount_ChangesBalance uses assertEquals method to check if the actual account balance matches the expected one after the withdrawal.
testWithdraw_MoreAmountThanBalance_Throws calls expectException method to inform PHPUnit that this test method will pass only if InvalidArgumentException is thrown.
PHPUnit configuration is located in the root folder of the project - phpunit.xml file.
<phpunit>
    <testsuites>
        <testsuite name="default">
            <directory>.</directory>
        </testsuite>
    </testsuites>
    <php>
        <env name="APP_ENV" value="testing"/>
    </php>
</phpunit>
A testsuites is a container for one or more testsuite elements, each specifying a set of tests and directory where they are located - in the sample project, we look for the tests in the root folder.
Please check the configuration file reference for the full documentation.
When the tests fulfill all the requirements mentioned in the previous section, they are shown in the Test Explorer. To display the Test Explorer, choose Test on the Visual Studio menu, choose Windows, and then choose Test Explorer.
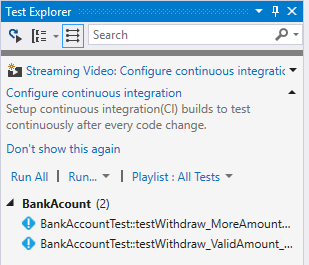
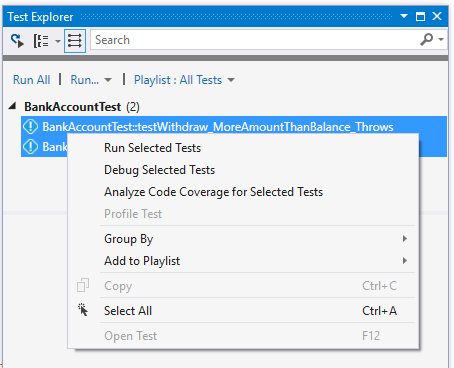
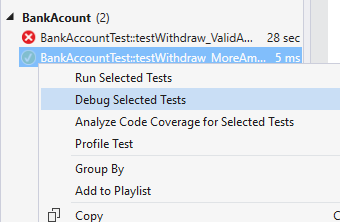
Click Run All to run all our tests or select some of the tests, right-click on the selection and choose Run Selected Tests.
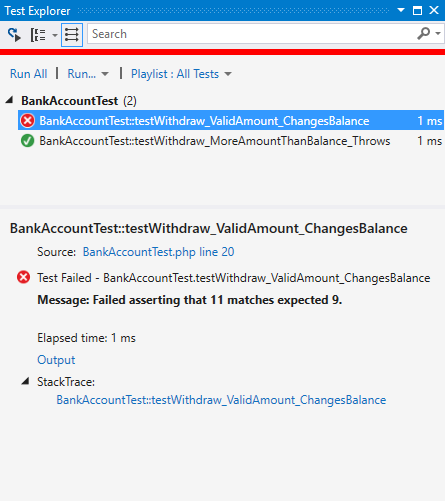
When the tests are finished, the Test Explorer displays the results of the tests in groups of Failed Tests, Passed Tests, Skipped Tests and Not Run Tests. We can select any of the groups and run just these tests e.g. tests that failed previously. So, we can save time running tests that we know have passed.
In the case of our sample, one test has passed and the other has failed. Also, we can see the amount of time the test run has taken. When we click on the test, we can examine the stack trace and an assertion message at the bottom of the Test Explorer.
To find out why it has failed, we can use a debug feature. Put a breakpoint to the failed test, then in the Text Explorer select the test you want to debug and right-click to see the context menu, choose Debug Selected Tests.
The debug session will start and we will be able to use VS debug capabilities: step, inspect variables, evaluate expressions etc. To see why our test is failing we can step inside (F11) the Withdrawal method.
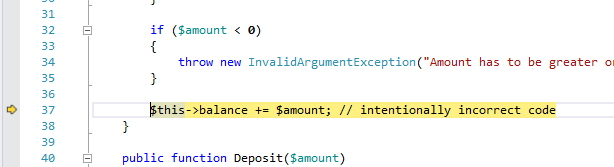
The code is deliberately incorrect. We can stop the execution of the test by pressing Shift + F5 or just finish the session by F5. Change += operator to -= and run the test again.
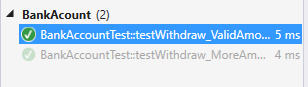
Now, all tests have passed.
In case we have a large number of tests, we can filter tests by matching text in the search box on a global level or by selecting one of the pre-defined filters. We can also group tests by category by choosing the Group By button. Tests can be grouped by Class, Duration, Outcome, Project and Traits.
When choosing Traits, we can group tests by the categories added with PHPDoc tag @group and the name of the group. We can also use annotation tags @small @medium @large, which also sets the timeout for the test, small 1sec, medium 10 sec, large 60sec. For more information check out annotations on PHPUnit site https://phpunit.de/manual/current/en/appendixes.annotations.html
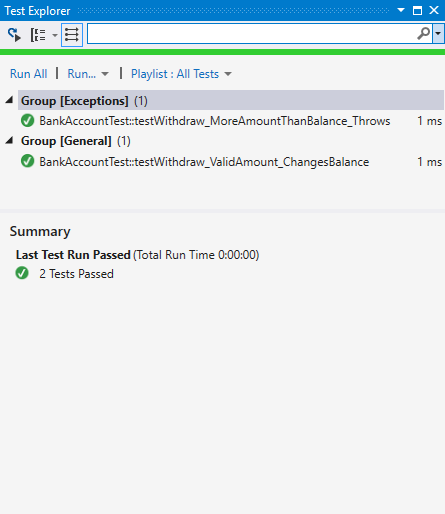
In the picture above, there are two custom groups defined in the test, Exceptions and General.
PHP Tools for Visual Studio comes with build-in PHPUnit in case you don't want to hassle with installing and configuring it. However, it's recommended to specify which PHPUnit should be used for the project. That can be done with Composer. If PHPUnit is installed through Composer, PHP Tools will recognize it and use it for running the tests.
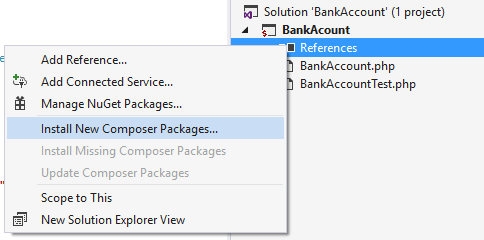
To install a PHPUnit package, right-click on the References** node in the Solution Explorer, select Install New Composer Package....
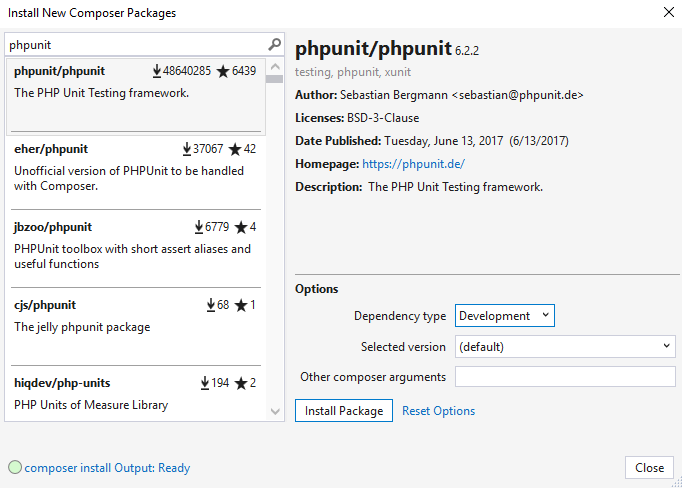
In the search box, enter phpunit, in the options select Development as Dependency Type and hit Install Package. We can close the dialog box, the package will install in the background. Once this is done, which we can see in the Status bar, we can run all tests again.
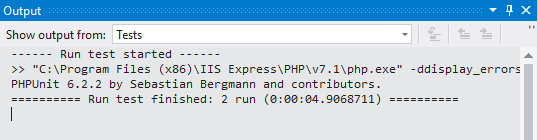
In the Output pane (View | Output Pane) we can see what PHPUnit version was used. In this instance, we've installed 6.2.2 which is the latest at the time of writing this article.
Update: That was a long time ago, the sample project was update to use PHPUnit 9.5
In this article, I've shown some basic functionality of PHP unit testing in Visual Studio. PHP Tools for Visual Studio integrates powerful testing tools available in Visual Studio with PHPUnit - making creating, managing and running tests as effortless as possible. That should result in saved time and fewer bugs.