Setting Up a Modern WordPress Plugin Dev Environment with VS Code (2026)#
Developing WordPress plugins shouldn't mean cluttering your OS with PHP installations or getting lost in the wp-admin core folders. In this tutorial, we will build a professional, containerized environment using Docker and PHP Tools for VS Code from DEVSENSE.
Step 1: Create Your Workspace#
Instead of opening the entire WordPress directory, we focus only on our code.
- Create a new folder for your plugin (e.g.,
my-plugin). - Open this folder in VS Code.
Step 2: Define Infrastructure with Docker#
We use Docker to keep our environment isolated and portable. Create a docker-compose.yml file in your root:
services:
  db:
    image: mysql:8.0
    volumes:
      - db_data:/var/lib/mysql
    restart: always
    environment:
      MYSQL_ROOT_PASSWORD: password
      MYSQL_DATABASE: wordpress
      MYSQL_USER: wordpress
      MYSQL_PASSWORD: wordpress

  wordpress:
    depends_on:
      - db
    build: .
    ports:
      - "8080:80"
    restart: always
    environment:
      WORDPRESS_DB_HOST: db:3306
      WORDPRESS_DB_USER: wordpress
      WORDPRESS_DB_PASSWORD: wordpress
      WORDPRESS_DB_NAME: wordpress
      XDEBUG_MODE: debug
      XDEBUG_CONFIG: "client_host=host.docker.internal client_port=9003 start_with_request=yes"
    volumes:
      - .:/var/www/html/wp-content/plugins/my-plugin
volumes:
  db_data:
Next, create a Dockerfile to ensure Xdebug is installed and active in your container:
FROM wordpress:latest

# Installs and enables Xdebug
RUN pecl install xdebug && docker-php-ext-enable xdebug
Right-click docker-compose.yml in the VS Code Explorer and click Compose up (or, if you prefer the console, run docker compose up -d).

Step 3: The Famous 5-Minute Install in 1 Minute#
Navigate to http://localhost:8080 in your browser.
Follow the WordPress setup wizard. You will not need to enter database details, only admin credentials.

Step 4: Turn VS Code into a Full PHP IDE#
Now, let's make the editor smart. Install the PHP Tools extension from the Marketplace.

Contrary to other tutorials that ask you to install 10+ extensions, you only need this one. It keeps your VS Code lean and fast—no more duplicate background tasks from competing extensions.
Continuous Code Validation: Everything is integrated. You get your code checked as you type, revealing troublesome issues and logic problems without even running the code. The built-in type analysis and code validation check the entire project in seconds, updating instantly as you work. Problems are listed in the Problems window and underlined directly in the editor, ensuring your WordPress plugin is solid from the first line.
Step 5: Activate Your Plugin#
Create your main plugin file (e.g., my-plugin.php):
<?php
/**
 * Plugin Name: My Plugin
 * Description: Developing plugins in VS Code with Docker and DEVSENSE
 * Version: 1.0
 * Author: Milko
 */

// Exit if accessed directly.
if (!defined('ABSPATH')) {
    exit;
}

/**
 * Filter to append a message to the end of every post content.
 * This is great for visual testing.
 */
add_filter('the_content', function ($content) {
    // Our message with some styling
    $message  = '<div style="background: #fff3cd; padding: 20px; border: 2px solid #ffeeba; margin-top: 20px; border-radius: 5px;">';
    $message .= '<strong>🚀 Hello from DEVSENSE!</strong><br>';
    $message .= 'This is being rendered from your local plugin folder.';
    $message .= '</div>';

    return $content . $message;
});
Once you've added the file, go to WordPress Admin -> Plugins. Because of our Docker Volume mapping, your plugin is already there. Click Activate

Verify that the plugin is working by opening http://localhost:8080.

Step 6: Leveraging IDE Intelligence#
Enable WordPress Stubs#
You don't need the WP core files locally. Just activate WordPress stubs:
- Open VS Code Settings Ctrl + ,
- Search for
PHP: Workspace Stubsand set it toWordPress.

This provides full IntelliSense and documentation for WordPress functions without the file system bloat.
For example, go to the plugin file and hover over add_filter, and you will see all the parameters.

Enforce WordPress Code Style#
WordPress has specific formatting rules, such as Yoda conditions and specific spacing.
- Open VS Code Settings Ctrl + ,
- Search for
PHP Format: Code Styleand set it toWordPress.
This utilizes the DEVSENSE formatter to instantly "comb" your code into compliance whenever you hit Alt+Shift+F or save the document.

Both stubs and code style can be configured by adding these two options to your .vscode/settings.json file:
WordPress Hook Completion#
Note: Make sure you have at least version
1.68of the PHP Tools extension to use this feature.
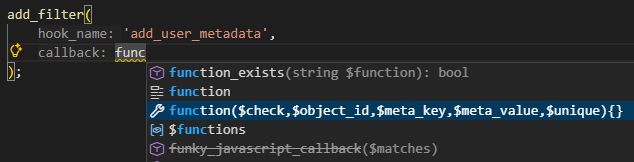
One of the most powerful features is the native support for WordPress hooks. When you start typing add_filter( or add_action(, the IDE provides a list of all available hooks (like the_content, init, or wp_head). It even handles dynamic hooks with placeholders, inserting them as editable snippets.

Even better—when you select a hook, you see a complete tooltip with documentation, explaining when the hook is fired and what parameters it passes to your callback. No more constant switching to the WordPress Codex!

Smart Callbacks & Inlay Hints#
To speed up your workflow even further, you can use:
- Callback Completion: When adding a filter or action, the editor suggests an anonymous function snippet with the correct number of parameters automatically.
- Inlay Hints: By enabling Inlay Hints (
editor.inlayHints.enabled:on), the editor displays parameter type information directly in your callbacks based on the corresponding hook signature. It’s like having live documentation bridge right inside your code.

For more details on how to customize these features, check out the official WordPress integration documentation.
Step 7: Debugging#
Forget browser extensions or manual session cookies.
- In VS Code, go to the Run and Debug tab and create a
launch.json. - Set the port to
9003and ensurepathMappingspoints your local folder to/var/www/html/wp-content/plugins/my-plugin.
{
    "version": "0.2.0",
    "configurations": [
        {
            "name": "Listen for Xdebug",
            "type": "php",
            "request": "launch",
            "port": 9003,
            "pathMappings": {
                "/var/www/html/wp-content/plugins/my-plugin": "${workspaceFolder}"
            }
          }
    ]
}
http://localhost:8080. - VS Code will pause execution where you need it. 
- You can step through execution and explore variables, etc.
Bonus: Local AI with IntelliPHP#
PHP Tools comes with a small, local model trained specifically on PHP code. Think of it as PHP Snippets on steroids rather than a full-blown Copilot replacement for generating massive blocks of code.
- Privacy: Nothing is sent to the cloud; your code stays on your machine.
- Micro-completions: It excels at predicting the next few tokens, like function names, variables, or short logic patterns, making your typing flow much smoother.
- Mobility: It works completely offline (perfect for coding on a laptop during travel).
- Speed: Zero latency. It works even on old laptops because it doesn't wait for a round-trip to a server.

Conclusion#
You now have a modern, professional workflow. Your workspace is lightweight, and your debugging is seamless.